
You may have asked yourself: “How do I publish my WordPress website?” or “What’s the best way to get my WordPress website online?”. As a budding developer – or as an agency that wants to improve its performance – you would surely be horrified by the flood of (outdated) search results on Stack Overflow and Google relating to WordPress development. So in this article, I’ll introduce you to a tried-and-tested deployment process that you can use to bring your WordPress website from a local device to a server. Let’s get started with SSH!
What is SSH?
SSH (short for “Secure Shell”) is a method of connecting to a system or server using the command line interface (CLI). Simply put, with SSH you no longer have to waste time jumping around different user interfaces to transfer your data.
Why is SSH so cool?
Once you’ve set up SSH, you no longer have to move files using drag and drop. This results in fewer errors and faster deployment times.
Who is SSH suitable for?
SSH can be used by development teams of any level and size. SSH is a very secure and fast way to edit your project and publish changes. Especially if you are working on larger projects, you will make your workflow much more efficient with SSH.
For example, in conjunction with Git, you can pack all your work into a repository and upload it to your server, as well as work collaboratively on a project as a team – without having to move files back and forth between each other.
Why use SSH at all?
Why SSH is used differs depending on the application. SSH is mainly used for these reasons:
- SSH is secure,
- fast and
- can be automated!
And as if that weren’t enough reasons for you: you can also link SSH with Git version control. If you need to roll back your development due to a bug or a broken feature, this is also very easy: a rollback is performed directly from your GitHub repository.
Using SSH as a junior developer?
Anyone starting out with SSH can quickly feel overwhelmed, as the system appears extremely complex at first glance. But don’t worry: this tutorial will guide you through all the important steps. As you may know, practical experience in development with Git and SSH is very valuable – and an industry standard these days.
Why would an agency use SSH?
Apart from the time-saving advantages and version control already mentioned, with SSH you can log in to your server securely from any device on which your SSH key is installed.
Not being tied to a specific device means freedom of location.
First steps with SSH
Raidboxes offers you a WordPress hosting plan for the free development of your WordPress projects. So if you want to practise SSH, you’re on the right track.
WordPress hosting management
With our Raidboxes dashboard, you get a seamless, intuitive interface that makes managing your WordPress sites easier, faster, and more efficient. Check it out!
Your Raidboxes box is the place where you will host your WordPress website. However, you will not be able to push your Git commits directly. This is a security feature of Raidboxes that ensures your box remains secure. Instead, you’ll need to use a third-party provider to pull your repo into your box using git pull. I used GitHub for this tutorial. Of course, you can also use another service – the process is quite similar.
I have visualised exactly how the process works here:

If you already …
- Git installed on your device,
- SSH keys are generated and
- you have added your public SSH key to GitHub,
then jump directly to step 4: Set up your SSH key in Raidboxes.
Step 1: Check whether you have installed Git
You can easily check whether Git is installed on the device you are using: Open your command-line tool (Windows) or the terminal (Mac) and enter the following command:
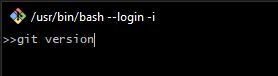
git version
If a version number is displayed, Git is installed on your device.
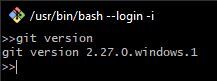
If you receive an error message, you can install Git here. (You may need to update Git if you are using an older version).
Step 2: Set up your SSH keys
Check whether there are existing SSH keys:
SSH keys are required to establish a secure connection to GitHub and Raidboxes via an SSH connection. If you are not sure whether you have already generated SSH keys, you can usually find them here:
- Open the Git Bash
- Enter the following command
ls -al ~/.ssh
If you have SSH keys, you will receive an output with the corresponding names:
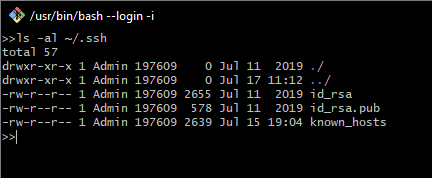
SSH keys can usually be found in the root directory of your users’ devices. Check the directory:
C:\Users\\.ssh
Further details on SSH keys can be found in the official GitHub Docs.
Generate new SSH keys:
There are various ways to create SSH keys. I recommend that you follow the documentation from GitHub Docs – there are instructions for Windows, Mac and Linux.
Step 3: Add your SSH key to GitHub
As a prerequisite for pushing your local development to GitHub, you need to add your SSH key to GitHub. Follow the official documentation from GitHub.
You can test whether you have set up the SSH key correctly by:
Step 4: Set up your SSH key in Raidboxes
Raidboxes allows you to connect to your server via an SSH connection. To do this, you must first register the SSH key in the GUI (graphical user interface).
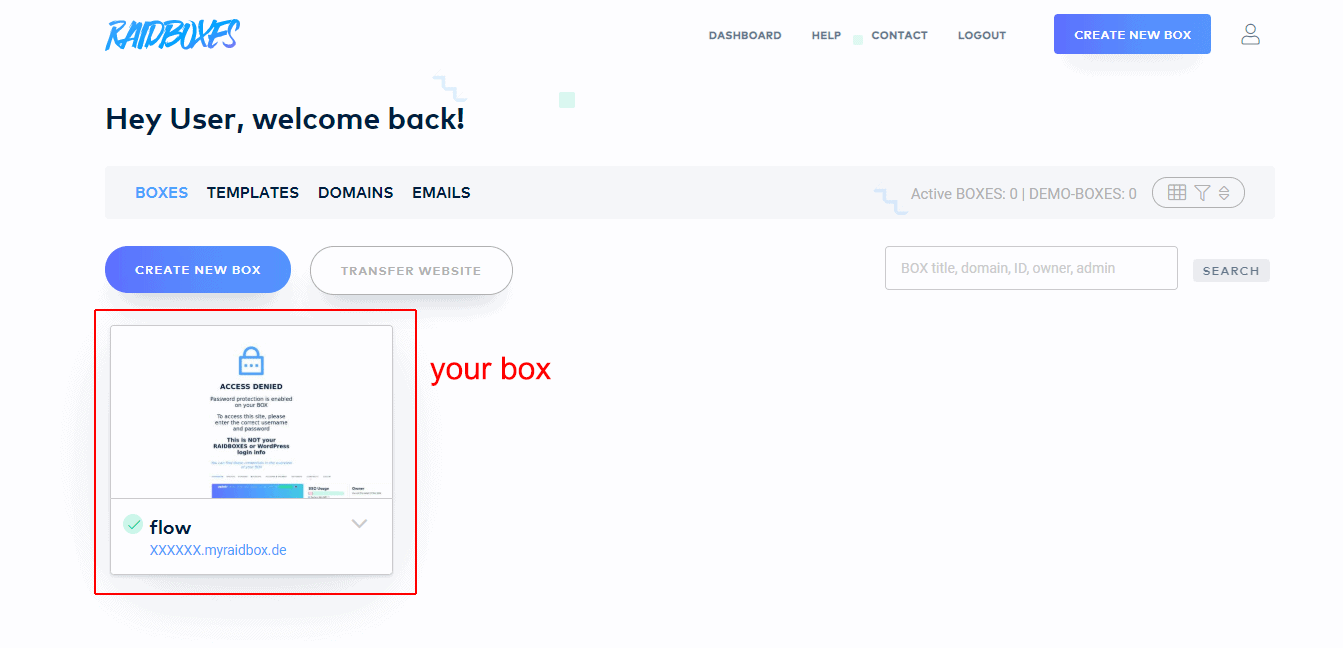
Log in to the Raidboxes Dashboard. Select the box you want to connect to via SSH:
Go to Settings > SSH:
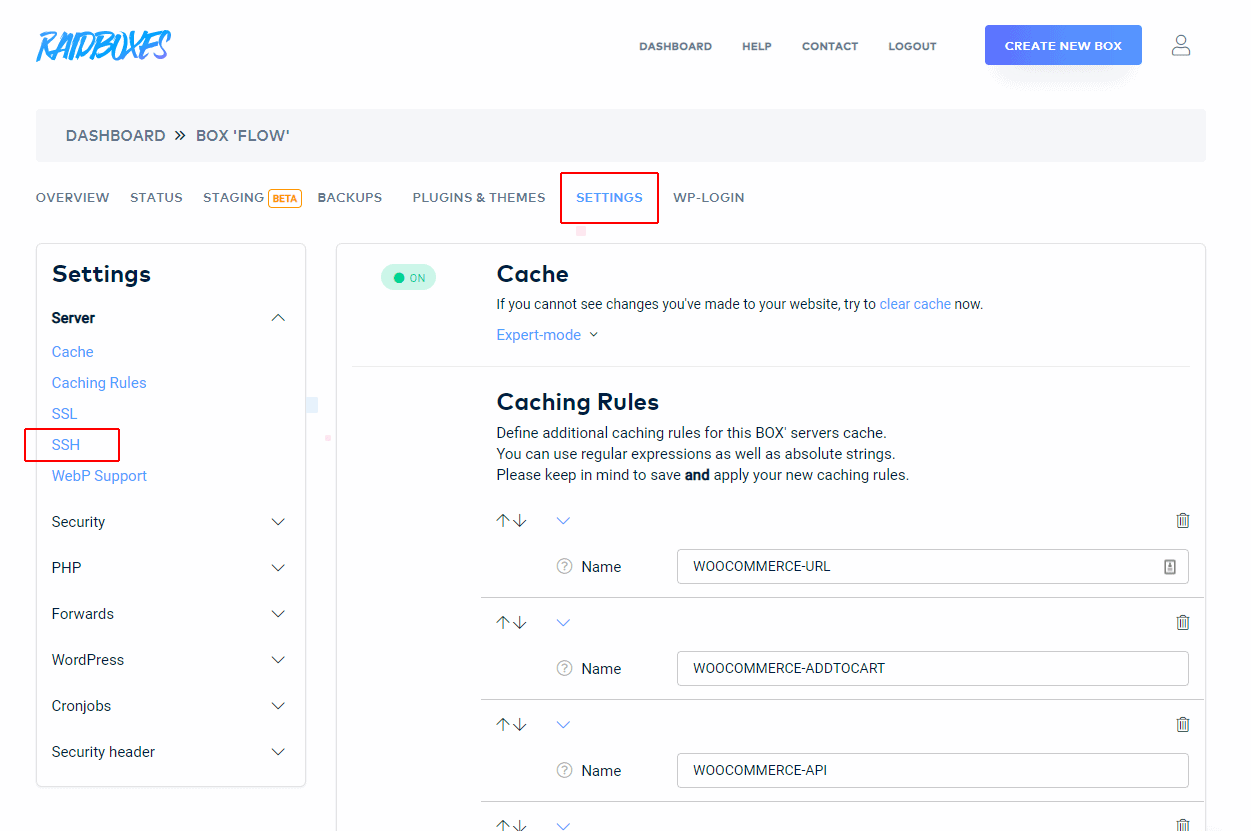
Activate SSH by clicking on the “Off” button to switch it on and select SSH settings:

Have your SSH key ready (see step 2). Raidboxes requires you to enter your public SSH key.
Go to the directory on your local computer that contains your SSH keys:
C:\Users\Admin\.ssh
Open the file id_rsa.pub. Copy the entire content of the file – including the ‘ssh-rsa’ at the beginning – and paste it into the SSH field:

Click on Save and return to the dashboard of your Box.
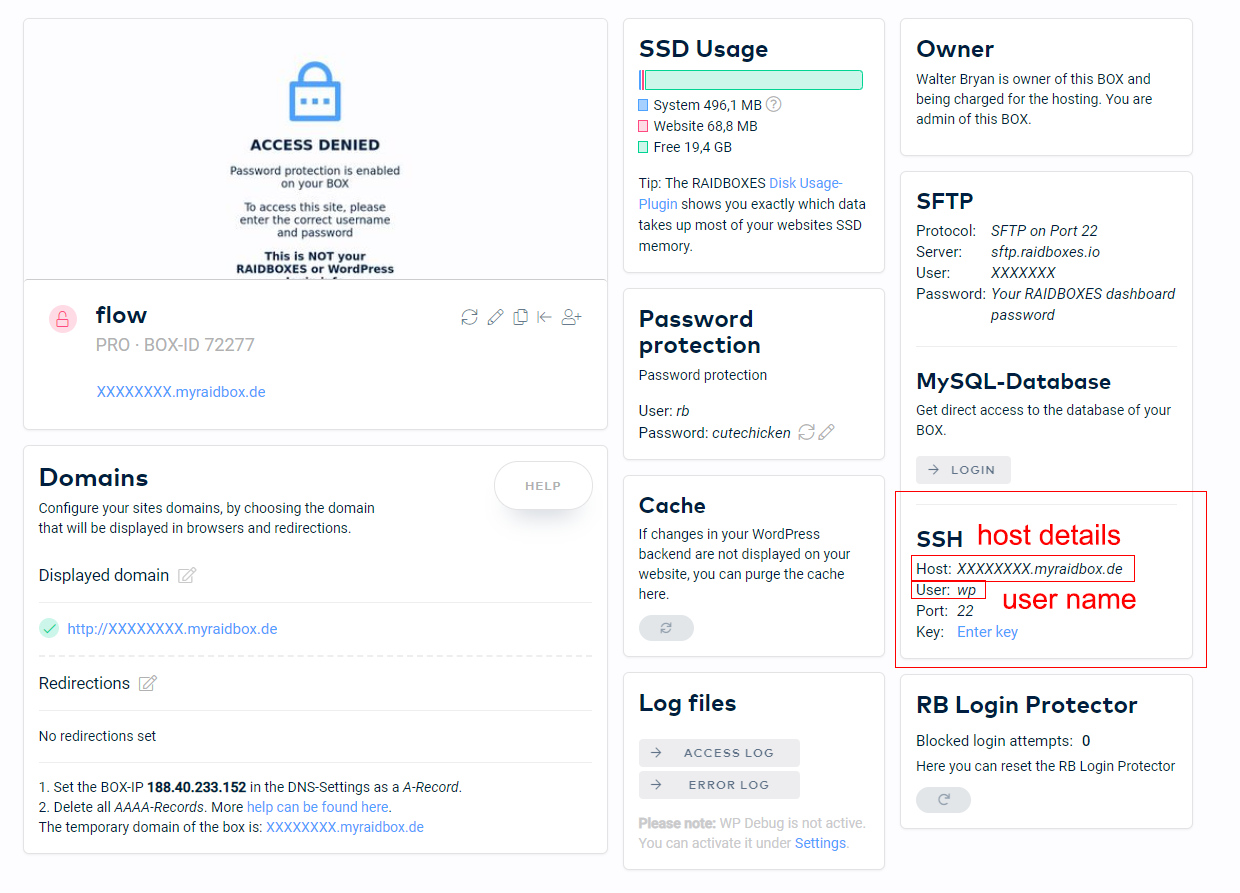
In the SSH section you will find your access data for connecting to Raidboxes via SSH. You need the following access data:
- User name,
- Host details and
- SSH passphrase that you created for your SSH key (see step 2).
Open Git Bash (Windows) or Terminal (Mac). The command for the connection via SSH is:
ssh @
An example with my dummy account would be:
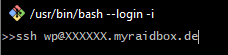
You will now be prompted to enter your SSH passphrase. Enter it – and welcome to your Raidboxes Box File Tree!
IF you receive a warning message that the connection is unknown (it is the first connection), you can proceed as follows:
- Enter Yes,
- exit Git Bash,
- open Git Bash again and
- enter your SSH Conflict details again.

Step 5: The Raidboxes directory structure
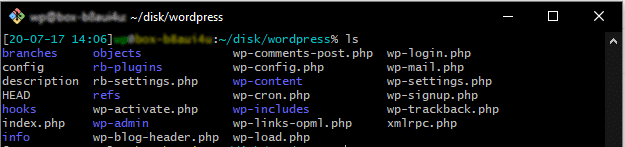
As mentioned in the welcome screen of the SSH connection to your Raidboxes box, your pre-installed WordPress directory is located in /home/wp/disk/wordpress. Your current working directory when you first connect via SSH is home/wp.
In this directory you do not have the appropriate authorisations to initiate Git and download your project with git pull – you wouldn’t want that either.
Switch to your work folder:
From this directory, you can change the basics of your WordPress website: If you run ls (list) in the console, your typical WordPress file tree will be displayed:
Step 6: Initialise Git in Raidboxes
Change the directories in wp-content/themes and create a directory. Initialise Git here and pull your locally developed theme from GitHub.
cd wp-content/themes
mkdir
cd
git init
Another cool feature of Raidboxes: Git is already installed on the server – as is WordPress CLI(WP-CLI). The last step is to pull your GitHub repository into the Raidboxes WordPress file tree.
However, to keep your box safe, Raidboxes does not allow you to load git push directly from your local device into your git repo. Instead, you pull it from a service like GitHub.
(If you have already pushed your local development project to GitHub, please continue with step 8).
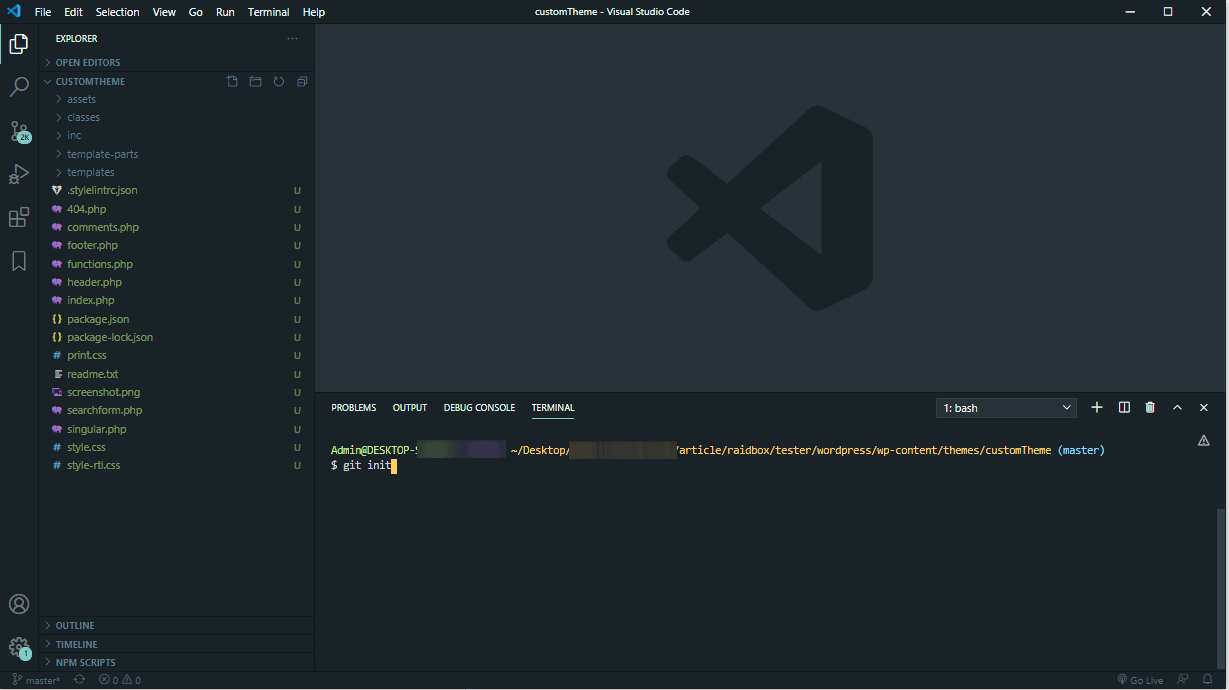
Step 7: Upload your local theme to GitHub
From your local device, navigate to the folder where your customised WordPress theme was created. Then initialise Git by running it in your terminal:
git init
Create your repo on GitHub and add it as a remote to your custom development. For instructions on how to create a GitHub repository, please read this documentation.

When you create a repo, you can choose between public and private. For contract work, it is best to choose private. Note that this will prompt you to add your GitHub username and password (not your SSH passphrase) if you want to run the git push or git pull commands.
Add your GitHub repo as a remote to use the git push command:
git remote add
As in this example:
git remote add gitHub
 https://github.com/XXXXXXXXX/customWordpressTheme.git
Add your files, transfer them and push them to your remote repository:
git add *
git commit -m ''
git push -u
(If you are not sure what the name of your remote is, run the command git remote -v. This will show you all the names of the remote repositories).
$ git push -u gitHub master
Fantastic! Now your theme is online and ready to be pulled into your box.
Step 8: Load your theme into Raidboxes
Just as you add your GitHub repository as a remote repository (so you can push your theme to GitHub), we will now add GitHub as a remote repository and pull the theme from the GitHub repository.
Open the Git Bash terminal in which you have connected SSH to Raidboxes. Make sure that you are in the directory of your WordPress theme folder in which you initialised Git (see step 6).
For example:
home/wp/disk/wordpress/wp-content/themes
Now add your GitHub repo as a remote.
You can find the remote address in GitHub:

Add the remote:
git remote add
git remote add gitHub https://github.com/XXXXXX/customWordpressTheme.git
Pulle now the repo from GitHub:
Please note: Branch is most likely called Master here. Unless you have changed it or are working in a different branch on GitHub.
git pull
git pull gitHub master
If the repository is private…
… you will be asked for your GitHub username and GitHub password – not for your passphrase.
Step 9: Activate your theme
Congratulations! The last step is to activate your WordPress theme. But why leave the terminal for this? Raidboxes already has WordPress CLI installed. With a few lines of code, you don’t have to click around in the WordPress UI.
Execute this command in the terminal:
wp theme activate
You can find a complete overview of the commands you can use with the WP-CLI in the official WordPress documentation.
If you prefer the UI, you can access all your themes from your Raidboxes dashboard. You can find them under the navigation point Plugins & Themes:
Conclusion on SSH and WordPress development
If you’re looking for a fast, secure and more efficient way to develop and maintain your WordPress website, using Git and SSH is the way to go. Trust me, you’ll soon wonder how you ever managed with any other workflow!
However, everyone works at their own pace and has individual preferences when it comes to the right workflow. I recommend you give SSH a chance in any case – and follow the steps described. You never know: you might be absolutely thrilled and never want to do without this workflow!
Thanks for reading. I hope this article has helped you to set up a suitable workflow that will make your life easier when working with custom themes. Get started today and take full advantage of the Raidboxes Dashboard!
What questions do you have for Matthias?
Please feel free to use the comment function. For more insights on WordPress, web design or online business, follow Raidboxes on Facebook or LinkedIn – or subscribe to our newsletter.
Leave a Reply