
WooCommerce is a renowned e-commerce tool used by more than five million websites. Its popularity is due to the countless customisable integrations for online payments, shipping and inventory management.
PayPal is one of these integrations. With its 128-bit encryption, PayPal is a great way to process customer data while protecting it from online fraud. Combined with its smooth checkout experience, it’s no wonder that PayPal has become the preferred payment processor for millions of websites worldwide.
If you would also like to benefit from the advantages of PayPal, read on. We’ll show you how to add PayPal to your WooCommerce shop – with instructions and images to help you.
What is WooCommerce?
WooCommerce is a WordPress e-commerce plugin that can be used to create and manage an online shop. It is a flexible tool that converts your website into an online shop where you can add products and accept payments.
You can also integrate other plugins into WooCommerce. For example, plugins for online payments with credit or debit cards such as Stripe and PayPal.
Customisations such as inventory tracking, shipping and tax management often make PayPal a preferred choice, especially for small and medium-sized e-commerce shops.
WooCommerce Hosting
With WooCommerce hosting, you can launch your own online store quickly and securely and manage it professionally – without any technical hurdles. Check our Raidboxes WooCommerce Hosting now.
What is PayPal?
PayPal is a global online payment system for sending and receiving money on the Internet. It operates on secure servers with high-grade encryption to enable secure money transfers. You can also use PayPal to pay for goods and services in participating e-commerce shops.
Users link their PayPal accounts with local bank accounts and debit or credit cards to deposit or withdraw money.
PayPal is available in over 200 countries worldwide, making it a convenient payment method, especially for online shopping. You can use up to 25 currencies for online transactions with PayPal.
PayPal for WooCommerce

PayPal is undoubtedly one of the world’s most popular payment methods. So it makes sense to set up a payment method that is trusted by over 400 million users, right? And this guide will help you get it right – we’ll get to that in a moment.
But first, let’s take a look at why PayPal is one of the better payment providers for your shop.
Why should you use PayPal in your WooCommerce shop?
PayPal combines the advantages of secure checkouts and reliability in your WooCommerce shop. Further advantages of setting up PayPal in your e-commerce shop are
- Accepted in over 200 countries worldwide
- Encrypted transactions for secure payments on your website
- Easy integration of e-commerce with PayPal WooCommerce website extensions
- Fast payouts in multiple currencies via local banks
- Multiple services in one platform such as invoicing, sending and receiving payments and processing refunds
PayPal checkout vs. PayPal Standard
PayPal offers businesses either PayPal Checkout or PayPal Standard payment channels. The main difference is that with PayPal Checkout, users are not redirected to the PayPal website to complete a transaction.
In contrast, PayPal Standard redirects users to the official, secure PayPal website to complete transactions.
Using PayPal Checkout offers a number of benefits for your business. It stores credit card details and shipping information. Your customers don’t have to fill out this information every time they shop with you. Another advantage is that Venmo and PayPal Credit checkout options can also be used in the US.
How to set up PayPal in WooCommerce?
- Activate PayPal as a payment method in WooCommerce
- Add your business details to Paypal
- Allow instant payment notifications (IPN)
- PayPal Sandbox: Test PayPal for WooCommerce
Installing PayPal in your WooCommerce shop is a step towards ensuring that your customers receive a smooth and secure checkout experience. Let’s take a look at the steps of the PayPal integration in WooCommerce.
Subscribe to the Raidboxes newsletter!
We share the latest WordPress insights, business tips, and more with you once a month.
1. activate PayPal as a payment method in WooCommerce
To connect PayPal to your WooCommerce shop, you need to download the WooCommerce plugin for PayPal payments.
Go to WooCommerce in your WordPress dashboard, click on Plugins > Add New and search for “PayPal” in the search field. Click on the WooCommerce plugin for PayPal payments and then on “Install now”. After successful installation, you must activate the plugin on the same page.

After you have added the Paypal WooCommerce plugin to your shop, you can now customise the payment method.
Go to WooCommerce > Settings and click on the Payments tab. Scroll down to PayPal and switch on the option to accept PayPal in your online shop.

In the next step, you can activate the PayPal login details either automatically or manually. In this guide, we will use manual entry.
Scroll down on the new page and click on Switch to manual entry of login data.

We’ll save the sandbox tests for later. For now, let’s concentrate on adding the login data.
2. add your business details to Paypal
If you select the option to enter your login details manually, you will be taken to a page where you must enter your business details. You can retrieve this data from your PayPal account.
There are two types of PayPal accounts: Business and personal accounts. A business PayPal account allows businesses to accept credit card payments and direct bank transfers. It’s a gateway to business accounts, just like a bank, only faster and paperless.
Assuming you don’t have a PayPal business account yet, you can easily open one. Sign up for a business account on the PayPal account page. Enter the required details such as company name, website, address and phone number. And voilà, your business account is activated.

After you have opened a business account, navigate to the PayPal settings on the dashboard and click on Account settings. The goal is to collect the information you need to proceed with the setup in step 1.

Scroll down, click on Business Information in the left sidebar and make a note of the PayPal Merchant ID on the right.

You will also need the customer ID and password. To do this, go to developer.paypal.com and log in. Click on the dashboard under your profile in the top right-hand corner and navigate to the My apps and login information section. Here, click on the Live button and then on Create app.

Enter the name of your new app on the new screen and click on Create app. On the following screen you will now see the client ID and the secret live key.

Now go back to your WordPress dashboard and enter the PayPal access data with the information you have collected.

Fill in the data carefully, check that it is correct and click on Save changes.
You will now be shown further settings for the PayPal checkout. There you can enter the title, the description and the intention for adding PayPal.
Finalise the configuration of the checkout by clicking on the checkbox next to“Activate PayPal Gateway“.

3. allow immediate payment notifications (IPN)
Instant Payment Notification (IPN) allows PayPal to send alerts to your backend when a transaction is completed on your website. To access this feature, you’ll need to go to your business account dashboard. In the left sidebar, scroll down to Website Payments > Instant Payment Notifications and click Update.
On the next screen, click on Select IPN settings .

To do this, you must fill in the URL to which the IPN messages should be forwarded. To do this, use this URL format: https: //your-domain.com/?wc-api=WC_Gateway_Paypal.
Remember to replace “your-domain.com” with the actual domain name of your website, otherwise this step will be incomplete. Here is an example: https: //example.com/?wc-api=WC_Gateway_Paypal.

Then activate Receive IPN messages and click on Save.
One of the benefits of PayPal checkout is that your customers can be redirected from the checkout page to the “Order Received” page back to your website. You may want them to return to the shop, read your blog or even offer them free resources that they can use to buy another product later.
To activate the automatic return, go to the PayPal Business Dashboard and navigate to Website Payments as we have shown before.
Select Website settings > Refresh.

Enter an order entry URL that your website visitors will be taken to after checkout, in this format: https://your-domain.com/checkout/order-received/. Again, remember to change “your-domain.com” to the domain name of your website. For example – https://example.com/checkout/order-received/.
Click on Save.
On this page you can further customise the PayPal integration. Options include entering a mobile phone number at checkout or allowing bank transfers and Giropay.
Settings such as blocking unencrypted web payments can prove useful if you want to increase the security of your shop.
Finally, your PayPal WooCommerce integration is almost ready. The last step is to test if it works.
4. PayPal Sandbox: Test PayPal for WooCommerce
How to create a PayPal sandbox account on WooCommerce:
PayPal Sandbox is a virtual environment in which you can test your newly integrated payment system in WooCommerce. A mock transaction is set up between a personal account and the shop’s business account.
In this way, you can check whether the integration works as expected without changing the processes in your WooCommerce Live Shop. The requirements for setting up a PayPal sandbox mode are similar to those for a regular PayPal account.
These are the necessary steps:
Step 1: Activate the PayPal Sandbox
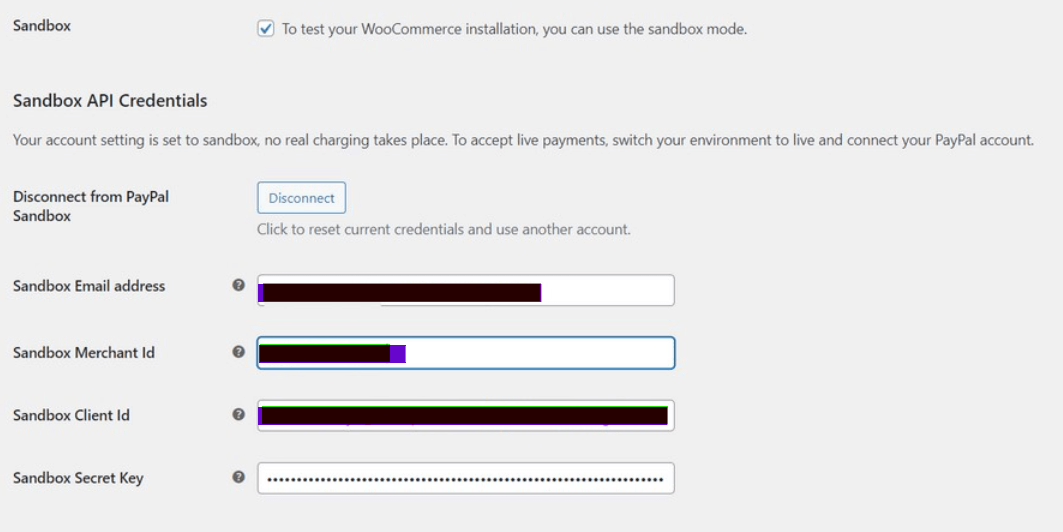
Go to WooCommerce > Settings > Payments and click Manage on the PayPal tab. Tick the“Enable PayPal Sandbox” checkbox at the top of the page.
Step 2: Create a new PayPal account or log in to your existing account
Create a personal PayPal Sandbox account. To do this, go to developer.paypal.com and log in to the dashboard. Navigate to Create account under Sandbox accounts.
Step 3: Retrieve API credentials and merchant ID from your PayPal Sandbox account
You need to connect your sandbox account to your WooCommerce shop to successfully complete a test payment.
To do this, retrieve your API access data from your sandbox account via Paypal Developer Account > Dashboard > Sandbox > Accounts.
Select the Business Sandbox account by clicking on View/edit account in the drop-down menu. Copy the API username, password and API signature. Click on the Profile tab and scroll down to find the Account ID, which is the Merchant ID.

Paste the details from the sandbox account into WooCommerce and save them.
Step 4: Test shopping in your WooCommerce shop
Now is the time you’ve been waiting for: the test.
Open an incognito window in your browser and call up the front end of your e-commerce shop. Select a product from the shop, go to the checkout and select PayPal as the payment option.
Enter the email and password for your personal sandbox account via PayPal Developer Account > Dashboard > Sandbox > Accounts.

Select a personal sandbox account and click on View/edit account in the drop-down menu. Copy the email ID and password as you will use them at the checkout in your shop.
Complete the transaction at the checkout of your online shop by entering the personal e-mail address and password of your Sandbox account. Proceed with the payment. If you are successful, you will be redirected to the “Order received” page.
To complete this step, you need to confirm that the transaction was complete. Return to the PayPal sandbox account, select Accounts on the PayPal dashboard and click on the business account you used to set up WooCommerce. Click on the dropdown menu and select View/Edit Account .
Scroll down under the Financing tab to check the current account balance.
Note that sandbox accounts have a balance of five thousand dollars, regardless of whether they are personal or business sandbox accounts. If the balance is more than $5,000, the test was successful.
Congratulations on a successful WooCommerce PayPal setup. Your customers can now pay securely in your e-commerce shop and checkout with Venmo, PayPal Credit or bank transfer via PayPal!
WooCommerce Hosting
With WooCommerce hosting, you can launch your own online store quickly and securely and manage it professionally – without any technical hurdles. Check our Raidboxes WooCommerce Hosting now.
Other WooCommerce PayPal plugins that you should consider
Other notable plugins that also offer PayPal integrations for WooCommerce are
- PayPal Express Checkout Plugin for WooCommerce – key features include guest checkout, support for recurring payments and support for local payment methods.
- Braintree for WooCommerce – key features include accelerated checkout with PayPal buttons, early fraud detection and easy integration with secure payment processing.
- PayPal for WooCommerce – key features include smart buttons for faster checkout, no setup or monthly fees, and frequent offers for PayPal marketing solutions.
Conclusion on PayPal for WooCommerce shops
PayPal for WooCommerce is a lifesaver for e-commerce shops that want to offer a secure online payment method. It is reliable, fast and can be used worldwide, making it a convenient payment method for online transactions.
Speaking of reliability: high-quality WordPress hosting is just as important as a secure payment service provider. Join over 16,000 satisfied Raidboxes customers from over 55 countries and take advantage of our free, no-obligation trial period.
Your questions about PayPal and WooCommerce
What questions do you have about connecting PayPal? Feel free to use the comment function. For more insights on WordPress, web design or online business, follow Raidboxes on Facebook or LinkedIn – or subscribe to our newsletter.
Leave a Reply