
Gutenberg opens up exciting new possibilities for you as a developer. In this tutorial, I’ll explain everything you need to know about the block editor. Learn how to create your own WordPress blocks and customise existing blocks.
Gutenberg is the editor that was released with WordPress 5.0. Gutenberg introduced the concept of WordPress blocks. This enables website operators to place design elements using drag & drop – without the need for an external page builder or programming knowledge.
Gutenberg will be used as the basis for full site editing in the future. In the past, it was always necessary to code, even if you used a page builder: For some changes and customisations, code came into play.
With every new major WordPress update, it becomes clear that PHP knowledge and traditional WordPress website development are no longer enough. As a WordPress developer, you need to master Gutenberg.
This tutorial includes:
- What Gutenberg is
- How to work with WordPress blocks
- How to use these new features and technologies to build powerful WordPress websites
Let’s dive into the WordPress Gutenberg tutorial for developers!
What is Gutenberg?
Gutenberg was first rolled out inWordPress 5.0 to simplify the creation of posts and pages in a purely visual way. However, this was only phase 1 of the project.
Gutenberg utilises modern technologies such as JavaScript, React and REST API to create a dynamic editor experience that mimics front-end editing. In this first phase, the Block Editor was released.
What is the Gutenberg Block Editor?
Gutenberg replaces the TinyMCE editor (often referred to as the classic editor) and lets you use content blocks to add elements such as text or images to your posts and pages.
With further updates and phase 2, Gutenberg will become a fully-fledged website editor. In future, it will be possible to create entire WordPress websites with blocks.
This means that anyone who develops WordPress websites must redefine their own developer workflow. PHP knowledge is no longer enough to create a WordPress website from scratch. You need to be familiar with JavaScript, React and REST API if you want to create customised blocks and design elements for Gutenberg-based websites.
Getting started with WordPress blocks
It’s exciting to embark on this new journey with the Gutenberg Block Editor. With this tutorial, you’ll learn everything you need to know before you get started with Gutenberg Development and create your own WordPress blocks.
What you need to know before you develop for Gutenberg
The most important language you need to know to follow this WordPress Gutenberg tutorial for developers is Javascript. More specifically, you need to know the ES5 version, which is supported by most modern browsers.
Newer features are included in the 2015 version, ES6, and in the latest version, ESNext.
WordPress hosting management
With our Raidboxes dashboard, you get a seamless, intuitive interface that makes managing your WordPress sites easier, faster, and more efficient. Check it out!
Understanding ES6 and ESNext can be valuable. However, if you want to use them in your WordPress block development, you need to know how to configure tools that convert your newer code to ES5.
You also need to understand JSX, which is a syntax extension of Javascript and also requires transformation. Since ES6, ESNext and JSX are so much easier to write than ES5, it’s worth the effort to set up transformation tools.
Webpack, in conjunction with Babel, is a popular transformation tool. This combination of tools minifies your Javascript.
Last but not least, knowing about React JS can help you immensely when creating your own WordPress blocks or following various WordPress tutorials for developers that focus on block customisation.
Content is saved differently in Gutenberg
In contrast to the classic content editor, content is saved differently in Gutenberg. Content is no longer saved as HTML, but as HTML comments in a specific structure with JSON format. This makes it easier to transfer content to another WordPress installation or to a content management system (CMS).
Saving content in traditional HTML is fine when you’re dealing with simple and text-based content. However, if you are dealing with dynamically generated content, your code will unfortunately become messy.
You don’t necessarily need to know the technical details about how WordPress blocks work. The important thing is that when you create content in Gutenberg, the HTML generated is free of parsed messy code. This is because all details are stored within HTML comments.
What you can do with the WordPress Gutenberg blocks
You can do several things in Gutenberg. If you are following a WordPress tutorial for developers, you should be aware of your options.
Let’s explore a few possibilities:
- Develop your own WordPress blocks: This is the most complex task you can do. Nevertheless, custom WordPress blocks are often worth the effort to achieve real customisation.
- Prepare your theme for Gutenberg: This includes following the theme guide suggested by WordPress.org to make your theme compatible for Gutenberg. This also includes customising the block styling to get the desired look of your theme and retain the block functionality.
- Customise or extend existing WordPress content blocks: As mentioned above, you can customise existing WordPress blocks in Gutenberg. This includes either adding custom block styles, adding filters via Javascript or customising block categories and block types that are displayed for specific customisable post types.
Set up a development environment for the Gutenberg Block Editor
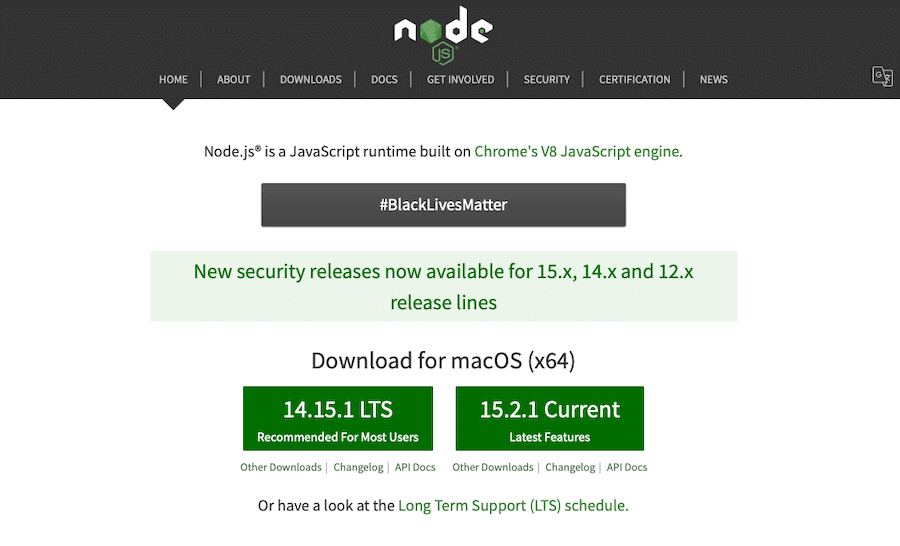
Before you can create anything with Gutenberg or complete any WordPress tutorials for developers, you need to set up a development environment. Your first step is to get Node.js. WordPress recommends using the Node Version Manager (nvm) to install and manage Node.
Within the cloned repository, you can build Gutenberg by executing the following:
npm ci
npm run build
This coding ensures that Gutenberg can be used as a plugin. Then add the Gutenberg directory you have created to the wp-content/plugins folder in your local WordPress environment. A White Pixel also recommends installing Webpack and Babel.
Go through all the setup steps to configure a development environment. You’ll need a local test site running WordPress with the Gutenberg plugin you created and access to Terminal to run a series of command line prompts. WordPress.org provides numerous resources for development scripts.
Now that you’ve set up and configured your local environment, we can move on to the main part of this WordPress tutorial for developers: WordPress blocks.
Understanding WordPress blocks
WordPress blocks are containers in which content is placed within the WordPress block editor. WordPress blocks can be moved via a drag & drop interface.
Understanding what WordPress blocks are is important before you create your own. WordPress blocks are also very extensive and include several important functions, including in relation to:
- Content: These frequently used blocks include paragraphs, headings, images, lists, quotes and multimedia.
- Formatting: Improve the formatting of your content with blocks that add code, custom HTML and tables.
- Layouts: Customise the look of your pages and posts with blocks to add page breaks, spacers, columns, button blocks and dividers.
- Widgets: These blocks allow easy insertion of widgets anywhere and include options such as shortcode, categories, social icons, RSS and latest comments.
How to create your own WordPress blocks
With this WordPress Gutenberg tutorial for developers, you’ll learn what you need to create customised WordPress content blocks. Then you can use them on your website or that of your customers.
Planning WordPress projects: From requirements to implementation
We spoke with Ben Hutchison-Bird from NINE Brackets about key strategies for translating client needs into successful WordPress and WooCommerce projects.
How to register new WordPress blocks
Each new block begins with registration. Use the registerBlockType function to register a new block type definition.
The block name is a string that must be written as namespace/block-name. Replace namespace with the name of the block you want to create.
From there, you need to define the properties of your new block, such as the title, description, category, icon, keywords or styles.
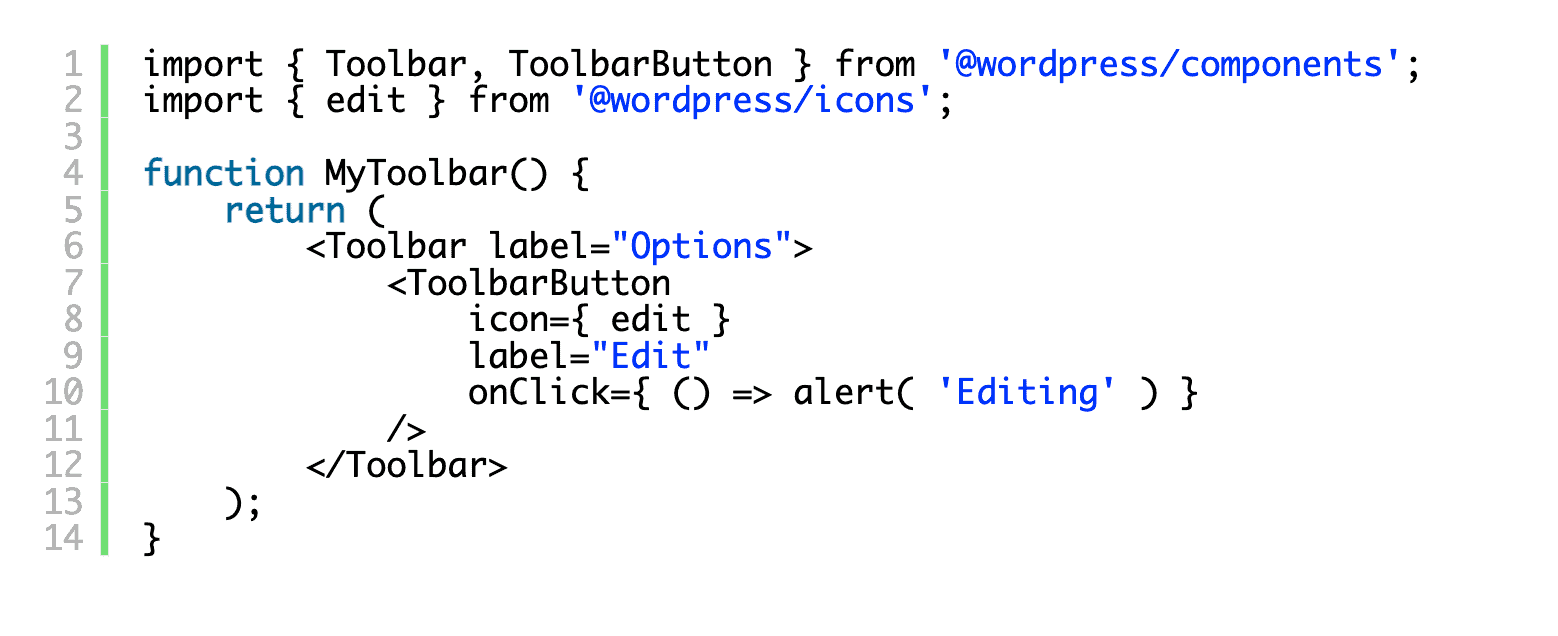
Add toolbars for customisable actions
If you want to add custom actions to your block via an interactive toolbar, you can customise working Gutenberg toolbars (or create them from scratch). Set custom icons, formatting, positioning and assigned actions depending on the needs of your plugin or theme.
According to the Block Editor Handbook, adding a custom toolbar could look something like this:
How to translate WordPress blocks
If you carry out internationalisation, you can ensure that the WordPress blocks you create reach a wider audience.
Since WordPress 5.0, you can use the wp-i18n JavaScript package to add translatable strings. You can also create translation files and have them loaded when a user requests content in that language.
Adding inspector settings
All blocks have a set of inspector settings that appear on the right-hand side of the screen when they are inserted into your content. And depending on the WordPress block, the aspects that users can customise are different. The inspector settings must be defined for each individual block you create.
You can add by telling WordPress which inspector controls should be used, how they should look, which options should be included and in which order they should appear.
The efforts of JavaScript for WordPress look something like this:
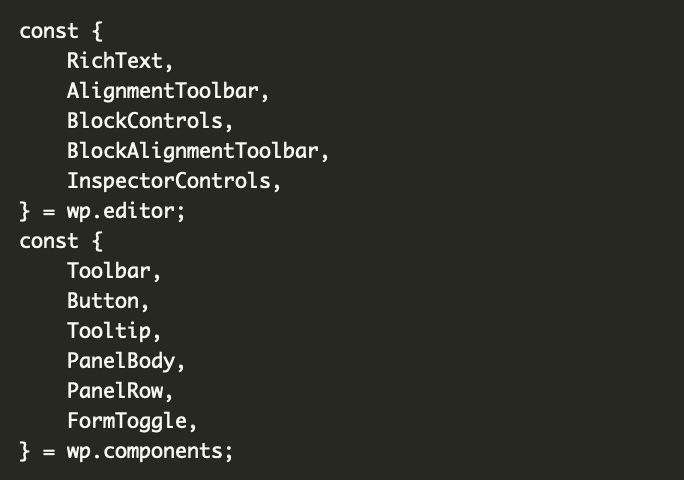
With these specifications, you can then use JSX to style each function and customise their order.
How to output dynamic content with PHP
Dynamic content is essential for WordPress. There are many reasons why you might need a dynamic block.
For example, if you want to create a customised Latest Posts block that displays the latest blog posts in real time, you need a dynamic block.
The block relies on PHP as it needs to retrieve new information each time it is rendered. The key for most blocks to make it dynamic is to change its storage function to null. Then insert code to instruct the new block to retrieve the appropriate content.
You can also set an attribute to instruct the block to display a certain number of posts.
Add customised settings to existing Gutenberg blocks
You can also add customisable settings and make changes to existing Gutenberg WordPress blocks. For example, you can add customisable controls to the advanced block panel within the inspector settings of a block. Jeffrey Carandang has written a great guide on how to do this in his blog.
Create custom block patterns
Let’s explore another aspect of Gutenberg in this WordPress tutorial for developers. With WordPress Block Patterns, you can create and share predefined block layouts. These are a grouping of WordPress blocks that allow you to create complex layouts with just a few clicks.
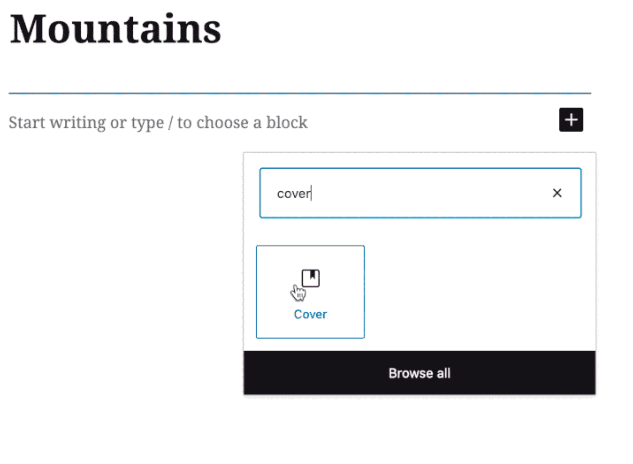
You can access the block patterns in the editing screen for posts/pages by pressing the + sign . You will then see all available block patterns for your website.
How to create your own block patterns
To get started, create a page or post design. Add blocks in any configuration you want. For example, if you run an online magazine, you may want to create a page layout for new articles with prominent titles, columns, images and quotes.
Next, you need to design the blocks so that they look the way you want them to.
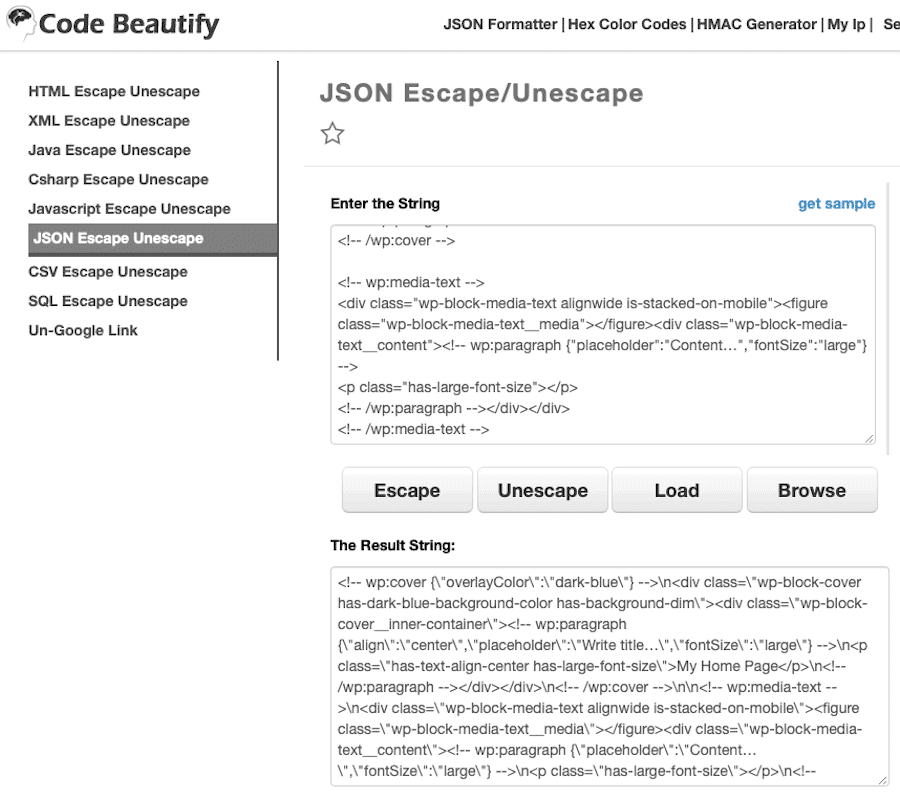
The next step is to copy everything you have done so far. Click on all your blocks while holding down the ALT key to select them. Then click on the icon with the three stacked dots (more options) in the toolbar. Click on Copy.
Next, you need to decode the HTML output you just copied. To do this, you can use the JSON Escape/Unescape tool. Copy the result string code that appears after clicking on Escape.
Now you need to register your new block pattern.
How to register and unregister block patterns
You can register a custom block pattern by using the Block Patterns API to paste the code you copied above into the functions.php file of your WordPress theme or by adding it to a custom plugin.
You can also use the Block Pattern Builder plugin to eliminate the coding requirements for creating block patterns.
How to use the Gutenberg Editor as a theme developer
Gutenberg makes it easy to develop custom WordPress blocks that make publishing content a rich experience. You can also use Gutenberg to eliminate the need for a separate page builder plugin like Elementor or Divi.
Gutenberg can be used to create responsive layouts for the home page by enabling full-width and full-width blocks. Or you can create a block-based theme from scratch.
Let’s discuss some of your options in detail.
Use cover blocks for adding page sections
Cover blocks are a newer addition to Gutenberg and are a great way to add different sections to a page. You can find more information in this video.
What are cover blocks?
Cover blocks are image blocks that you can overlay text on. They are a great way to create headers or custom sections that you would find in WordPress page-building plugins or WordPress themes.
Overlay blocks that you can add are:
- Picture blocks
- Video backgrounds
- Heading blocks
- Heel blocks
- Button blocks
Cover blocks make your website more versatile. This way you can create a customised homepage. You could even create a simple WordPress theme with a combination of cover blocks and block patterns.
Even more extensive options for the complete editing of websites like template manipulation, advanced block patterns and global styles are also on the horizon.
Using the Advanced Custom Fields plugin
One limitation of blocks is that you cannot achieve a full width layout: It will always be in boxes.
However, with a few clever manipulations, you can use the Advanced Custom Fields plugin to add custom meta settings and force full-width layouts. This is essential if you want to use Gutenberg to create your own themes.
Use customised block styles
Another way to use Gutenberg as a theme developer is to use custom block styles. Once you have created block patterns or used cover blocks to create page sections, you can then add or remove block styles to each block involved.
You need to know the name of the block so that you can add or remove styles associated with it. This additional step makes it possible that the custom CSS class does not have to be inserted every time the block is used.
WordPress blocks for landing pages and front pages
We’ve already mentioned how effective cover blocks can be for creating homepages for your website or theme. They also work great for landing pages.
A few other blocks that are worth mentioning and can help with this task are:
- Galleries
- Column blocks
- Image blocks
- Table blocks
- Text blocks
Most of the blocks can be used in conjunction with the cover image blocks to create a professional looking homepage.
If you need more functionality, you can add a Gutenberg Block plugin that adds a single block to Gutenberg, or a Gutenberg Block Library plugin that adds multiple.
Ultimate Addons for Gutenberg and Atomic Blocks are outstanding library options that provide an easier site building experience with blocks for testimonials, call to actions, page layout options, contact forms, pricing tables and shortcodes.
Plugins are ideal for those who want to familiarise themselves with Gutenberg and develop websites – without using a lot of code.
Final thoughts on WordPress blocks
The WordPress Gutenberg block editor is now part of WordPress Core and the development team behind WordPress has big plans for it. Eventually, you’ll be able to use Gutenberg to create navigation menus. And in the future, the editor will be compatible with even more themes.
With the help of this WordPress tutorial for developers, you can now use WordPress blocks to create websites and customise content to suit your needs.
You can now create WordPress blocks from scratch and eventually create entire WordPress websites with the inbuilt block editor.
In the meantime, you should make sure that the websites you develop are hosted with Raidboxes. Raidboxes offers comprehensive WordPress hosting packages that are suitable for both individual website owners and agencies.
Your questions about Gutenberg Development
Do you have questions for Maddy about the Gutenberg Guide for developers? We look forward to your comment. For more insights on WordPress, web design or online business, follow Raidboxes on Facebook or LinkedIn – or subscribe to our newsletter.
Leave a Reply